Kedgeree: mumma’s recipe

When I was younger I used to hate kedgeree. I don’t know why, as I love it as an adult (then again, I also used to eat picked onions whole from the jar and now I can’t stand them!)

As with many things, some recipes are only at their best when cooked by mum. But this week I had a change of heart and decided to make kedgeree for the first time myself – using my mum’s recipe of course.

My mum’s recipe is slightly different as she doesn’t use curry powder like so many others do, but she does add cubes of cheese to the mixture at the end. The cheese partially melts and is a lovely addition to the fish, so I would definitely recommend it!IMG_3047

Now, I didn’t happen to have any haddock when I made this recipe and as it was hailing outside I didn’t much feel like running over to the supermarket to get some. So my dish is made with kippers and salmon; this was a lovely change though kippers have quite literally 403 bones in each fillet so I probably wouldn’t use them again.

To make my mumma’s kedgeree, you will need:

1 cup of rice

2 hard boiled eggs

2 portions of haddock or other white fish (the less bones the better)

3 tbsp single cream

2 tbsp Philadelphia cream cheese

½ handful of cheddar cheese (cubed)

Parsley (chopped)

To make:

  1. Boil the eggs for approximately 7 minutes so that they are hard boiled. Drain, and put to one side to cool.
  2. Boil the rice. Whilst the rice is cooking, simmer the fish in a pan of water for around 10-15 minutes until cooked.
  3. Drain the fish, de-skin, and then flake. Do not put the fish back in the pan before flaking as you are unlikely to be able to remove as many of the bones.
  4. Once flaked, add the fish to the rice and simmer on a low heat to keep warm. Pour in the cream and mix. Then add the Philadelphia; sometimes I find it easier to pour a tablespoon of hot water on top of the Philadelphia as it helps it to mix better, but its up to you.
  5. Whilst the mixture is simmering, peel the eggs and chop into slices.
  6. Add the cheddar to the mixture and keep on a low heat for a few minutes.
  7. Remove the pan from the heat, dish up and add the boiled eggs on top with parsley to serve.

Let me know what you think!

IMG_3050

IMG_3049


When only a chicken & mushroom pie will do

The last few weeks have flown by and it’s nice to finally have the opportunity to sit down and reflect. We had what felt like a rushed Christmas and New Year, covering nearly 1,000 miles seeing our various family members across the country. And whilst the festivities were lovely and it was nice not to be at work, our attention was somewhat elsewhere despite the busyiness.

We were let down on our house purchase only a couple of days before Christmas so, naturally, at my work Christmas party I hit the red wine with full force! Our agent advised us that whilst the market is always slow in the winter, there was definitely a downturn – and we could see that ourselves.

I was quite content to move back into rented, confident that we would find somewhere to buy within a few months and then we would be in a really good position as ‘first’ time buyers. Sam was more sceptical and even talked about doing up our house a bit more and staying there for another couple of years. I went along with that briefly, but ultimately had to ‘fess up that I simply didn’t have the heart to empty all of the boxes we had already packed (at that stage, the count was 32).

We arrived at my parents’ home on Christmas Eve and discussed the hells of the house buying process whilst baking mince pies and swigging mulled wine. We had a quick look online and I widened our search to include a village which was literally the furthest I would consider living. The house I had loved several months before was still for sale and both Sam and my mum loved it. We decided to view it over New Year. Since then it’s been 100mph!

We loved the house so much we put an offer on it, which was accepted 🙂 the best part was, as it had previously been rented we were able to move in and break the chain for our amazingly tolerant buyers. We are now renting the house for a month whilst the conveyancing goes through and then we will once again be home owners. But this time, of a much larger family home!

We’ve been here 10 days now and it feels like home, not a house. It’s fair to say I was a bit apprehensive on moving day as it felt like the end of an era and I wondered if we had made the right decision. Once our first little home was empty of our belongings it suddenly didn’t feel like a home, it was back to being a house again. It felt strange suddenly realising that it is not the bricks and mortar that make a home, but the items and memories that fill it.

Our new home is wonderful and I am so glad we made the move. My commute is better and that has made me so much happier; I am able to have an extra half hour in bed and still have a whole hour to get myself ready before having to leave, rather than rush about! I’m planning on using this time constructively in the morning to work on my appearance (I sometimes look like I’ve been dragged through a bush backwards) and to make my lunch.

To top it all off, I decided to make a pie today. It’s my favourite food and the ultimate in making me feel content and warm and squishy. This is the life I’ve always wanted; a home smelling of baked bread and cooking, the radio on in the background whilst I leaf through my bookcase and think about what the next novel should be. I’m sat at our breakfast bar typing this with a mug of earl grey for company and a big grin on my face!image

Part of my happiness is probably down to my cooker; it is a Rangemaster, a brand and type of cooker I’ve always wanted and the sellers are leaving it here for us for free! Life win, right there.

image

So if, like me, you like or LOVE pies, here is my chicken and mushroom pie extraordinaire:

You will need:
Knob of butter
Half an onion, chopped
1 garlic clove
300g mushrooms
4 chicken thighs (boneless)
Dried thyme
1 chicken stock cube
200ml water (boiled)
200ml milk
50g flour
3 tbsp single cream

For the pastry you can either buy ready-made short crust (for the base) and puff pastry (for the top) or you can make it yourself. I’m hopeless with puff pastry so I used a ready-made block but it’s definitely worth making the shortcrust yourself if you can:
200g flour
125g butter
1 beaten egg
1 tbsp water

Bake!
1. To make the filling melt the butter in the pan and added the chopped onions and garlic. When golden add the mushrooms. Chop the chicken into small bite sized pieces and add.


2 Leave to cook, stirring occasionally, Add the thyme and salt and pepper as necessary to season and mix up the stock with the water.
3. Once the chicken is no longer pink, add the flour and slowly add the milk, Then add the stock and stir. You want to keep it on a low heat so that it is only simmering. 4. Add the cream and stir. As soon as the sauce is thick and creamy take it off the heat to cool.image
5. Now for the pastry. First make up the shortcrust base by either rolling out your pre-made dough or by making your own. Mix the flour and butter together with your fingertips until it looks like breadcrumbs. Add the egg and water and scoop up the flour mixture so that it it becomes a doughy ball. Now roll out so that it is just bigger than your pie dish.
6. Place the shortcrust base into the dish then spoon in the filling.
7. Roll out your puff pastry and place on top. If you are very good then you should be able to slip your knife into the outer edge of the puff pastry to loosen it. That will help it to rise and puff!
8. Then brush on some beaten egg round the edges and on top and bake in the oven for c.45minutes at 180-200 degrees.

Et voila!image

image

image

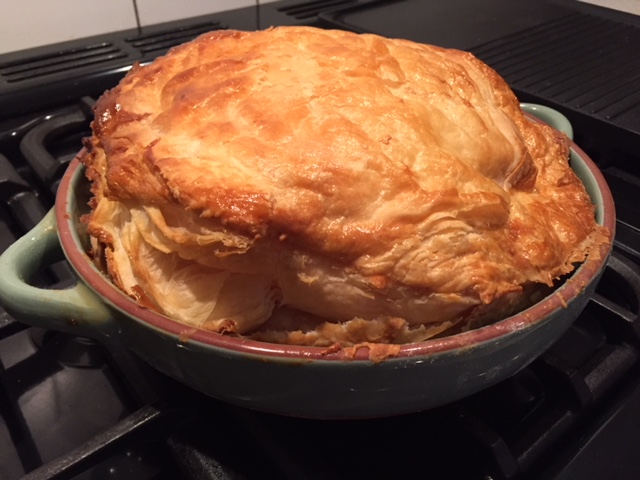
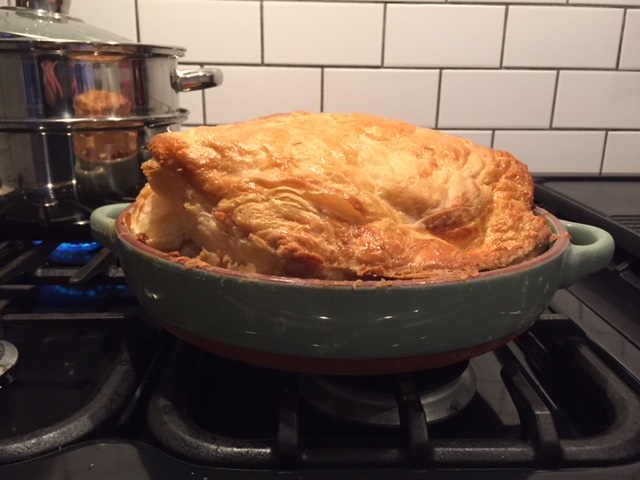
Perfect pie if I do say so myself. I hope you enjoy it

Super simple and scrummy: squash

My father grows many different varieties of vegetables in all colours of the rainbow, so when I was handed this one I honestly believed that it was a courgette as he said, and planned my dinner accordingly.

SAMSUNG CAMERA PICTURES

Except its not. A courgette that is. Its a squash. And the clue? The massive seeds inside that are similar to a pumpkin! Good job the two vegetables don’t taste vastly different or I might by having words with dearest father for ruining my meal!

Anyway, I happen to love squash and figured it would still work. So here it is, my quick and simple mid-week dinner: squash with bolognaise sauce, topped with Parmesan. A low-carb super-tasty alternative to pasta.

You will need:

1 squash (this will only work if your squash is bowl-shaped)

Quorn mince (or meat, of course)

Mushrooms

Spinach

Garlic

Chilli (optional)

Tomatoes (fresh, tinned – its up to you)

Parmesan, grated

How to make:

  1. Cut the squash about a third of the way down from the stalk, all the way around. Scoop out the seeds and place on a baking tray.
  2. Cover the squash with foil and bake in the oven for approximately 40 minutes at 200 degrees.
  3. Whilst the squash is cooking, brown off the mince and mushrooms in a frying pan, adding garlic and chilli as you wish. Add the tomatoes and salt and pepper for seasoning, and let it simmer.
  4. Once the bolognaise sauce is nearly ready, add a handful of spinach leaves and let them wilt in the steam before mixing them into the sauce. Leave on a low heat.
  5. Remove the foil from the squash and bake uncovered for another 8-10 minutes.

It really is that simple. Remove the squash from the oven, pour on your sauce and enjoy! You can eat the squash rind, but make sure it is soft and supple or it will have the texture of orange pith.

SAMSUNG CAMERA PICTURES

SAMSUNG CAMERA PICTURES

We are moving house shortly and I am really looking forward to growing my own vegetables and herbs. Sam is going to make me a vegetable trug and I’m hoping to get a small greenhouse too. Its so exciting – a bit like The Good Life! I can barely keep a few flowers alive each year, so this will definitely be a challenge for me, but one I am going to embrace whole-heartedly. If anyone has any tips for a super-newbie gardener, do let me know what to do and not do!

Recipe: white bloomer bread

I honestly have the memory of a goldfish. I’d completely forgotten to share my bread recipe with you all and let you know the results of our little village fete a couple of weeks ago!

The fete was far better than we imagined it would be for such a small village. There were over one hundred entries and at least 5/6 in each category. We were quite proud to have taken part! The main contenders were in the popular categories as you’d expect – there were no fewer than 13 Victoria sponges. In the amateur-baker category of ‘artistic cake’, were these stunning bakes:

I loved looking at all the vegetables though – there were leeks as thick as my arms and runner beans nearly 2 feet long. It really inspired me to get growing my own vegetables once we’ve moved house – there is just nothing like fresh home-grown produce really.

IMG_2514

IMG_2512

IMG_2508

IMG_2509

Anyway, we didn’t win the cookie nor the bread categories.

IMG_2503
Can you spot ours?

I was a bit annoyed as the cookies were lumped in the same category as biscuits, and biscuits placed in all three top spots despite there being several cookie entries. I think the judges were probably traditionalists and not on the cookie band-wagon.

Whilst we are of course slightly biased, the bread was definitely the most eye-catching entry and when we collected it at the end many people came up to us and said we should have won. We won The People’s Choice Award in my opinion given all the amazing comments we had!

So, if you want to make bread that looks a bit like this, follow our easy recipe below.

SAMSUNG CAMERA PICTURES

SAMSUNG CAMERA PICTURES

You will need:

500g flour

Teaspoon of salt

Instant yeast

30g butter

320ml water

Baking time!

  1. Mix the flour, salt and yeast together in a mixing bowl.
  2. Add the butter and about ¾ of the water and carry on mixing together, adding the remaining water as you go. The dough should be soft and not too wet when its ready.
  3. Now cover your table with a bit of flour and start to knead the bread. I find kneading quite hard – I think you need strong arm muscles to do it properly! I find circular motions are easier and most effective, but whatever works for you. Knead for about 10 minutes until the dough is malleable and smooth.
  4. Now to prove it. Place in a bowl and cover with cling film or a tea towel or anything similar. Leave it on the side for a couple of hours until the dough has nearly doubled in size (some people I know put theirs in the fridge but I don’t think that works as well). Towards the end of the prove, start to preheat your oven to 220 degrees.
  5. Put some flour on your kitchen table and place the dough on top and start to roll. BE CAREFUL – I find the harder/more I roll the less air is in the bread and it becomes more dense. This is less so if you are using proper white bread flour, but not if you are using a standard white flour. Roll into a long-ish rectangle and then divide length-ways into three sections.
  6. Those three sections will form the plait. If you don’t know how to plait, you simply place the outside strands into the middle of the other two strands, working from side to side; line up the three strands and then pull the 1st far-left strand into the middle between strands 2 and 3. Now, pull the now-3rd strand into the middle of strands 1 and 2. And repeat. Try to keep the plait fairly tight so there are not large holes. At the bottom and top simply tuck the strands together and underneath itself.Some people plait bread differently by only plaiting half way and then turning the dough over and finishing the plait. Apparently this gives the bread a bit of stability but I personally do not notice any difference in the bake. I have long hair and plait it all the time – maybe I’m a pro-plaiter!
  7. Depending on the size of your loaf you may need to prove it again for another hour. See below for an alternative to this.
  8. Next, line a tray with some baking parchment – I like to butter the tray first but I think that’s just because I can be quite clumsy! Place your bread on the tray and bake in the oven for about 30 minutes at 220 degrees. I like to dust some flour on top beforehand but its up to you.
  9. Then leave to cool on a rack for 10 minutes and enjoy whilst its still warm!

Whilst the dough needs proving as at step 4, I’ve found that proving the three individual strands of the plait separately works a bit better – however you need to keep them straight on a flat surface and sometimes the strands may swell more in certain places. I will leave it to you to decide!

SAMSUNG CAMERA PICTURES

Yummmmmm-y.

Recipe: Gooey Daim Cookies

We received a small paper leaflet through the post a few weeks ago advertising for our local village fete. We like to support local activities but then realised this fete was very local and invited people to show various fruits, vegetables, flowers, crafts and bakes. It was 15p to enter a particular category and the prize money – get this – was 75p for first place and 50p for second place!

So obviously with that amount of prize money up for grabs we had to enter (!)

We scoured the various categories and eventually settled on making bread (any type) and cookies (very specifically, only 6 were to be shown). I wanted to do a slightly different take on a chocolate cookie so decided to use Daim bars as I think they have a slightly more bitter, salty taste.SAMSUNG CAMERA PICTURES

Now, I should probably say that whilst I love cooking and baking I am not actually very good at it. Cake baking I find hard as I don’t really like measuring out the ingredients but I’ve quickly learnt that that is pretty key! This was also my first time making cookies and I was really worried they would just spread out on the baking tray and be too thin and burn, or be too soggy. As it was, they turned out pretty good!

I did a trial run a couple of nights before and realised that I should have left them to bake for a couple of minutes longer, as although the chocolate had started to melt, the dough was still super soft underneath.

So, lesson learnt I set about to make the second batch and they turned out lovely!

SAMSUNG CAMERA PICTURES

You will need: (makes approximately 20-25 tasty, gooey cookies)

150g of butter

300g all-purpose flour

1/2 tablespoon of bicarbonate of soda

1/2 teaspoon of vanilla extract/sugar

1/4 teaspoon sea salt

150g light brown soft sugar

100g caster sugar

1 egg

1 egg yolk

2 tablespoons of milk

5 Daim bars, chopped into small pieces

Lets bake!

  1. Melt the butter in a medium-sized saucepan and put to one side to cool.
  2. In a mixing bowl, combine the flour, bicarbonate of soda, salt and vanilla.
  3. Mix the two sugars together and add to the butter, stirring to remove any lumps. Add the egg, the egg yolk and the milk and stir until smooth.
  4. Slowly add the flour and mix, ensuring there are no lumps.
  5. Add the Daim pieces and stir through to even them out.
  6. Place in a mixing bowl and cover with cling film and place it in the fridge for a few hours.
  7. Preheat your oven to 190 degrees and grease a baking tray, covering with baking paper.
  8. Form the dough into rough balls (trust me, mine weren’t balls but more like odd-shaped blobs!) and place on the baking tray, about 2 inches apart.
  9. Bake in the oven for 8-10 minutes. I found that setting a timer for 7 minutes and then monitoring it minute by minute helped. Although you want the Daim bars to be gooey, you also the cookies to have a lovely golden colour to them so try not to take them out too early. About 9 minutes is perfect depending on your oven.

Enjoy!!

I was up at 7am this morning finishing off the bake so that they would be fresh for the fete today. Then Sam said that presentation was likely to add points, so I couldn’t possibly just put them on a plate! After a bit of panicking I came across a super-simple way of creating a little box from a paper plate on Google, so sent Sam to the shop to buy some paper plates.

To make the box, you just need to make 4 cuts, 2 at the top about 2 inches apart, and 2 at the bottom. Then fold from cut to cut on each side, and then across so that the fold dissects the cuts at 90 degrees. Then sellotape into place. These are possibly the worst instructions in the world so I’ve copied a picture of where the cuts and folds need to be below:

48404252-50a7-4ec0-9f7d-0a7bfe445bb5
Photocredit: http://www.musely.com

& here are the amazing hopefully-category-winning Daim cookies!

SAMSUNG CAMERA PICTURES

SAMSUNG CAMERA PICTURES

SAMSUNG CAMERA PICTURES

We’re off to the fete now so I’ll let you let you know it goes! Wish us luck!

We also made some bloomer bread as well so I’ll have to remember to post our recipe for that soon too.


Scrumptious chocolate marmalade cake

At the weekend I made a chocolate marmalade cake. I was really excited and had been looking forward to it for days. I love the taste of sticky orange marmalade – especially the thick cut variety. So when I set down to make the cake I decided to follow a recipe to the tee so that it would taste delicious! I often go off on a tangent of my own when cooking and rarely weigh any ingredients, so this was pretty much a first me.

SAMSUNG CAMERA PICTURES

I settled on a recipe made famous by Nigella Lawson, though I strongly recommend you adjust the cooking time unless your oven doesn’t actually bake anything! My cake was done in half the time Nigella said it would take, so it ended up a bit burnt!

To make a chocolate marmalade cake you will need:

Ingredients

  • 125 g butter (plus optional 50g for the topping)
  • 100 g good quality dark chocolate (plus optional 50g for the topping)
  • 300 g marmalade (plus optional 50g for the topping)
  • 150 g castor sugar
  • 2 eggs, beaten
  • 150 flour
  • 2 teaspoons baking powder
  • A little orange zest for decoration

Let’s bake!

  1. First you should preheat the oven to 180 C
  2. Then sift together flour and baking powder in a bowl and set aside.
  3. Melt the butter in a large saucepan over a low heat. When it has melted completely, add the chocolate pieces, stirring as you go and allow them to melt. Keep stirring until the chocolate-butter mixture is completely smooth and has no lumps.
  4. Now add your marmalade(!) sugar and the beaten eggs. Keep stirring until it is all mixed together.
  5. Sieve in the flour little by little until there are no lumps or streaks.
  6. Pour the mixture into a greased 9-inch baking tin and bake at 180 C for 40 minutes (you made need even less than this if your oven is top-notch like mine!) or until a skewer inserted comes out clean.
  7. Once the cake is done, allow it to cool for a few minutes.
  8. Next, make chocolate butter cream by melting chocolate in a bowl over boiling water (do not let the water touch the bowl).
  9. Beat the butter until is has a smooth, creamy texture then mix into the melted chocolate.
  10. Spread the remaining marmalade over the top of the cake and, whilst it is sticky, pour over the chocolate buttercream.
  11. Grate some orange zest over the top to finish.

Ta dah!

SAMSUNG CAMERA PICTURES
It really does not look as impressive as it tastes

If I bake this cake again I think I’d make a two tier sponge and use marmalade in the middle, or make a loaf cake. On its own, the single tier as Nigella recommends doesn’t do the cake justice – it tastes lovely but looks a bit… sorry for itself!

I hope you enjoy it as much as I did!