

The last few weeks have been a bit of whirlwind and things I’ve wanted to blog about I haven’t got round to doing. And then I realised that I haven’t written at all about our van and we have carried out so much work to it!
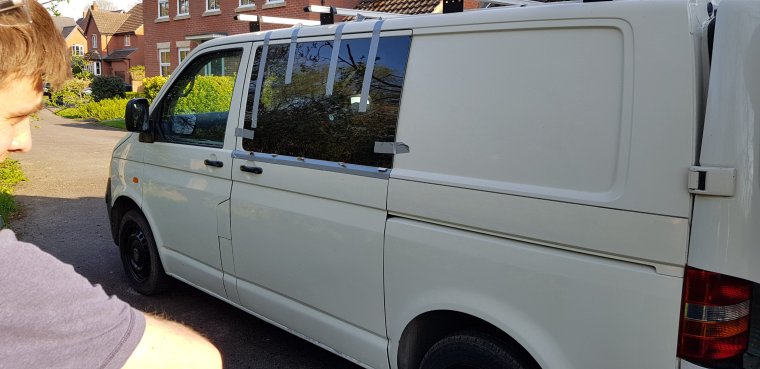
We bought the van in April and in just two short months it has gone from this…

To this!
From the beginning we have always wanted to do the work ourselves, and desperately wanted to avoid using standard VW conversion flat-packs. The one important thing for us was to optimise the use of space; I’m 5’10” and Sam is 6’3” and we didn’t want to feel over-sized as if we were sitting on/using children’s furniture! Pinterest has been a vital tool in our van conversion box. It is honestly amazing the amount of ideas you can get from that lil social platform, whether its space-saving tricks or different layout designs, it has it all. Plus a load of dreamy pictures of people on the road (us one day!)
I thought it might be helpful for those of you thinking of/in the process of converting a van if I broke down each step we have taken to get the van to the condition it is currently in.
Ripping it out
For those of you who have bought a van with an empty rear – great! For those of us that didn’t, there’s a two-day job in getting the back stripped out. For us, we had to remove the ply sideboards and floor, get rid of old and really worn glues and adhesives and take out the metal bulkhead separating it from the front cab. Once you’ve got down to the exposed metal, its time for the deep-clean. A bit of washing up liquid or car cleaner mixed with water works well on the inside, but be careful of any wires, plus the break-lights at the rear. FYI, even if your van doesn’t look like it needs a wash, it needs a wash.


Windows
Our van was a hard-grafter during its working life and had no windows in the back at all. When you are thinking about how you want to use the space, you really do need to take into account the amount of light. Some people only have windows in the sides at the back (whether that’s the front-section or all the way along the sides), but we have opted for windows in our barn doors too. Sam was a bit unsure about this as its not particularly common, but we are so glad we did it as it makes the space feel larger and like you are part of your surroundings when in the van.
Cutting the windows in is no mean feat, so if you are hopeless with anything technical then get a professional. I am terribly lucky in that Sam is an engineer and most at home with using power tools – one of the drawers in his garage is actually marked aggressive tools which basically means I should not go in there or I will hurt myself! We ordered the glass for the sides and back from CamperGlass, which is slightly tinted and offers some privacy. Because I am hopeless at explaining how he did it and with what, we filmed a video that you might find useful:
Insulation
Some people really go to town with their insulation, stuffing every tiny hole and using boards too. We took a ‘moderate’ approach and stuffed the walls and wheel arches, and then lined it with aluminium insulation roll and tape. We did the roof, and partially covered the floor too. This part can take quite long – its mainly sealing it all off with the tape that’s time consuming but stick with it.


Carpet
Once you’re insulated, its time to carpet! I will say from the beginning that this was a job neither of us looked forward to. The carpet is semi-stretchy and quite forgiving, but we had to watch several YouTube videos to understand how people were able to carpet an entire side of a van in one go. Once you’ve done one side though, it does make the rest easier. I do have a top tip: hold the carpet higher on the ceiling so you have equal amounts draping over the ceiling and the floor. As you start to glue it to the van, the massaging movements to get it into every nook and cranny can cause the carpet to start to fall, even though I was holding it as high as I could into the roof whilst Sam pushed it into the side of the van. You will need to use spray adhesive, and coat both the van and the carpet in it otherwise it will not stick that well.
We carpeted both sides of the van, the sliding door and the barn doors. So many people warned us against carpeting the doors, and especially up to the seal of the doors in case water leaks in, but we worked out a way round that. We have carpeted up to near-ish the seals, leaving a small 1cm gap. We made sure the cut in the carpet was straight and even so that it lines up nicely on the door. We have just bought a black strip seal, thinner than the one on the body of the van, which we will use to line the door. You can’t see the thin seal from the inside and it doesn’t prevent leaks either.
We opted for a light cream/grey carpet as we want an airy feeling in the van. The most common (and maybe cheaper?) colour is dark charcoal grey but we didn’t fancy that. The marl white/grey is lovely, and its good quality.
Floor
Once the carpet was in we re-laid the ply floor (ours came with the van and was cut to fit). We then laid the flooring which we got from B&Q. It’s a wood-effect vinyl flooring but sticks down rather than being slotted together. Its so easy and also very durable and won’t move at all. I’m quite impressed with its quality as I am usually a stickler for using proper timber/untreated wood not laminate. So there you go!
Next steps
Now that the inside is as ready as it can be, we can start to build the bed and cabinets. Sam has just bought the wood from B&Q (costing £180) and will hopefully be hammering it all together in the next couple of weeks. We are going to be building the cabinets from cheaper ply, and then the work surfaces and doors will be made from old floor boards we already have to give it a sort of rustic look.

The bed will go down the far side of the van opposite the sliding door. It will be a galley sofa essentially, and the bottom will slide out to form the double bed. We can then store the bedding underneath it during the day.
Best buys
It is so easy to spend a fortune when converting your van, but by doing most of the things ourselves we have saved so much money. Our friend has a van and has bought all the kits for it – he estimated he will have spent £11k plus the cost of purchasing the van by the time its done. Ours is on track to come in at £3k 🙂 Far more palatable!
Think about what is important to you and what you are like to use most, as well as how often you are likely to use the van. Its easy to spend £60 on a tap but ours is self-pumping (one push!) and that was £16. Instead of a £450 fridge we have an electric cool-box – same capacity for only £50 plus we can take it out for the day if we are going for a picnic. Savings can be made if you look into all of the options. I’ll post about these items and more once we have made some progress with the interior build.


